Category Archives: Glimakra single unit drawloom

No More Dallying!

Woven shibori scarf in progress.

It’s been a long and very cold winter, and I will spare you photos of the last blizzard.  It’s also been a period when I wasn’t feeling 100%, and more than anything wanted to hibernate, and often did.

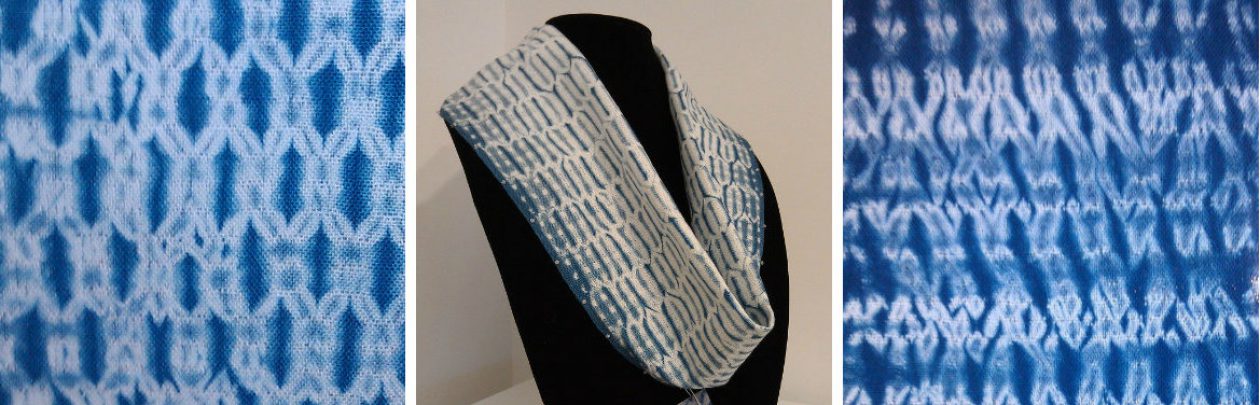
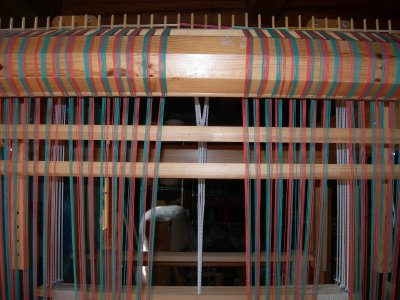
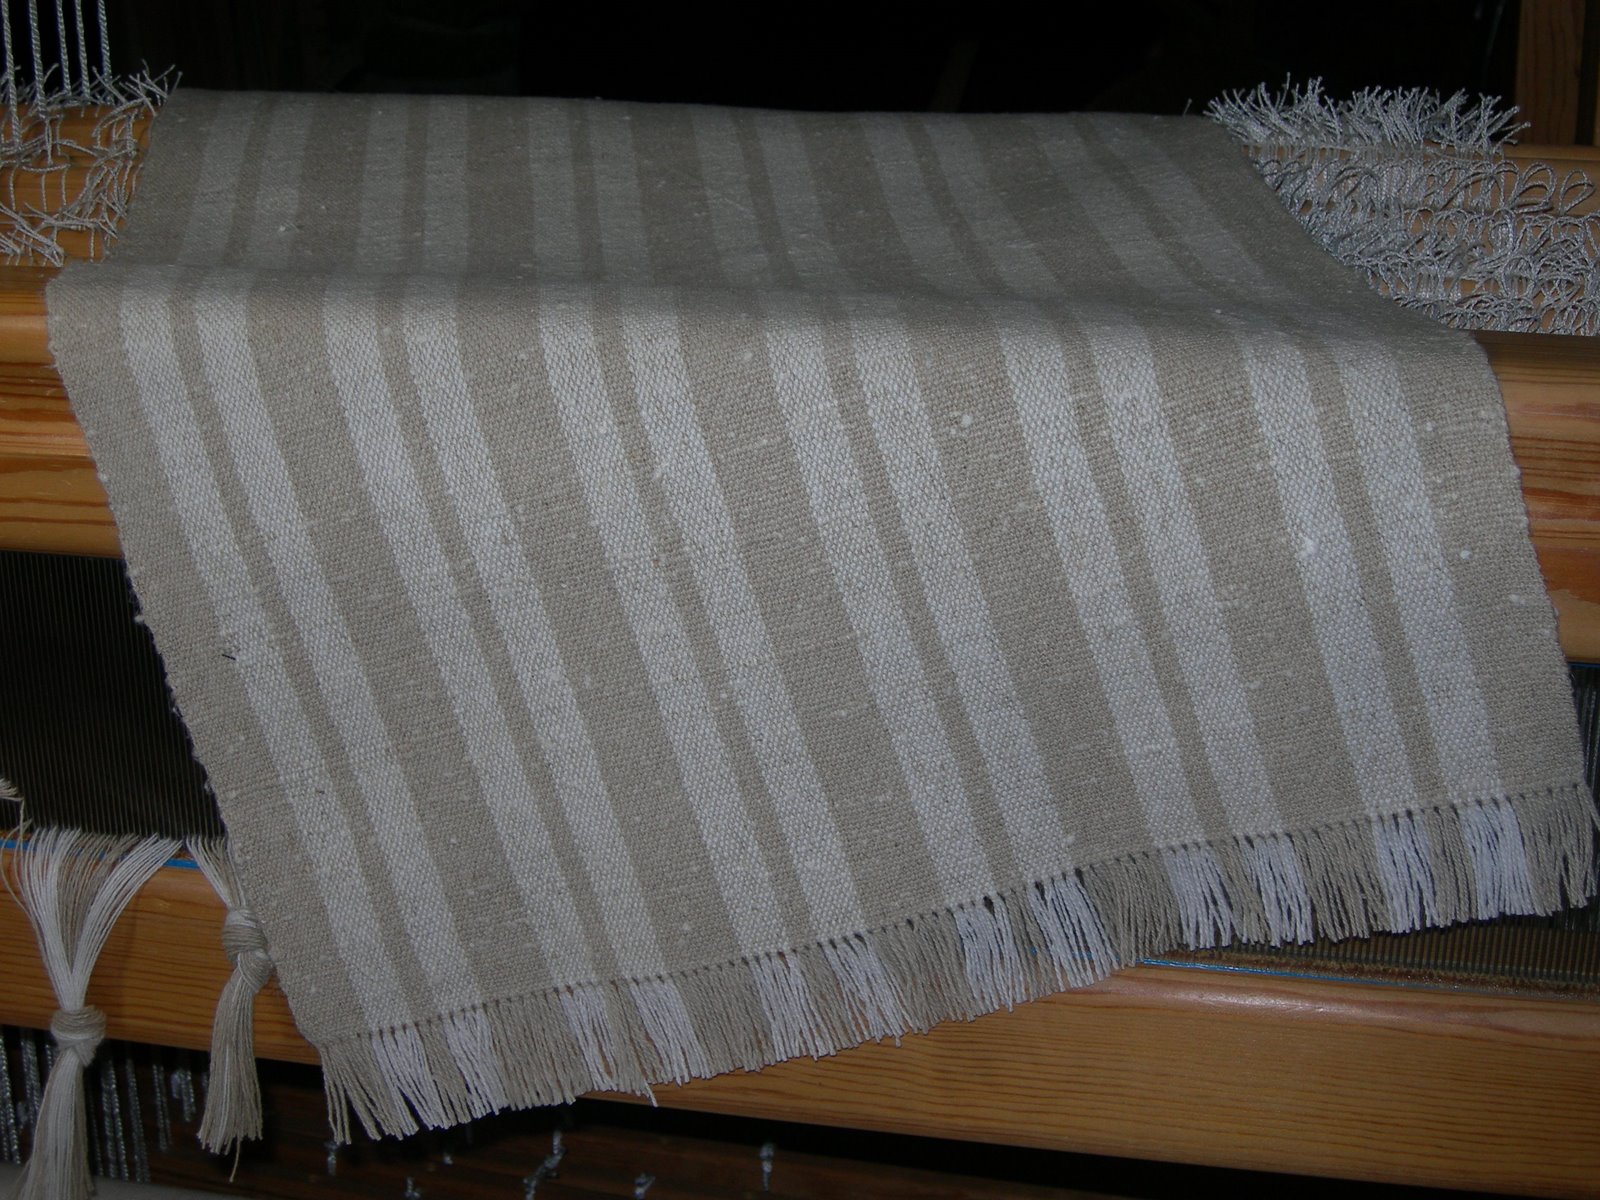
Perhaps spring is on the way?  I want to weave, and am back working on a somewhat narrow warp for woven shibori scarves (above).  This scarf is being treadled randomly and the number of plain weave rows between each “pattern” row also varies. 16/2 Bockens cotton, sett 30 epi, and I’m using a neutral color of rug warp for the pattern rows which are removed after dyeing with indigo. Stay tuned to see the finished scarves!

Drawloom warp is threaded, sleyed and tied on, ready to weave.

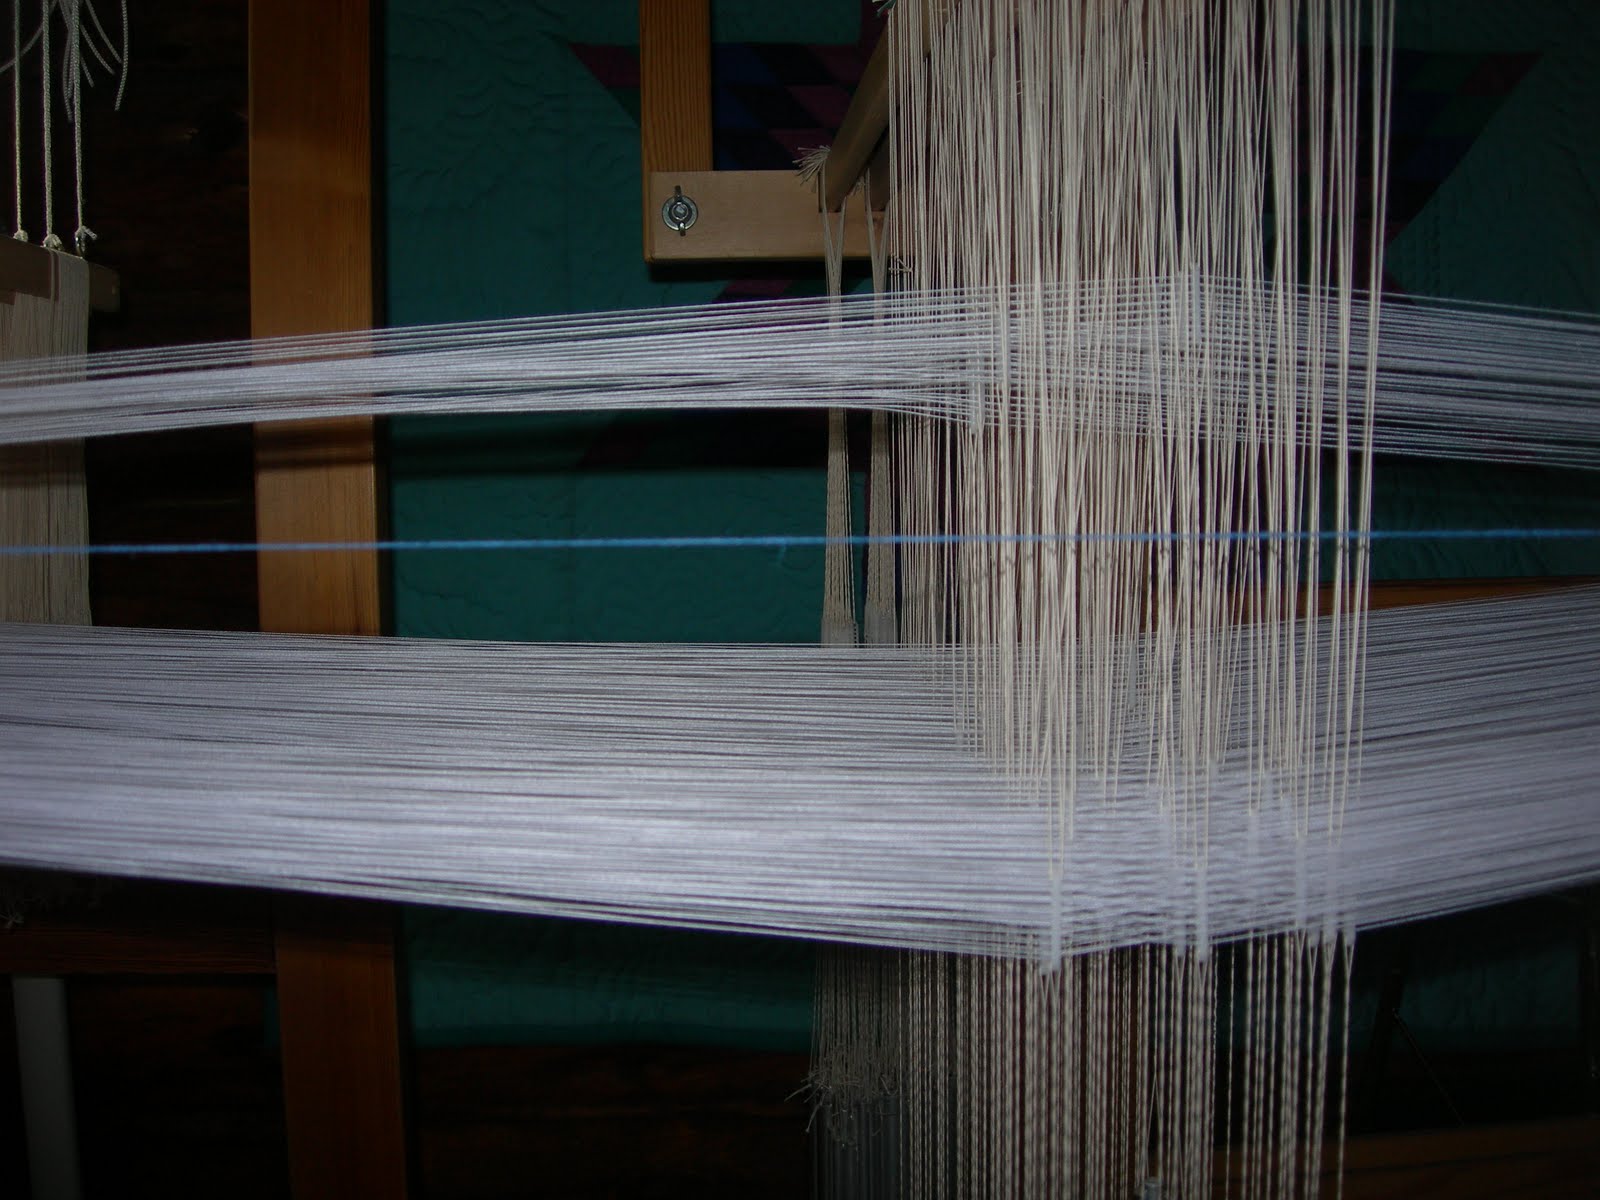
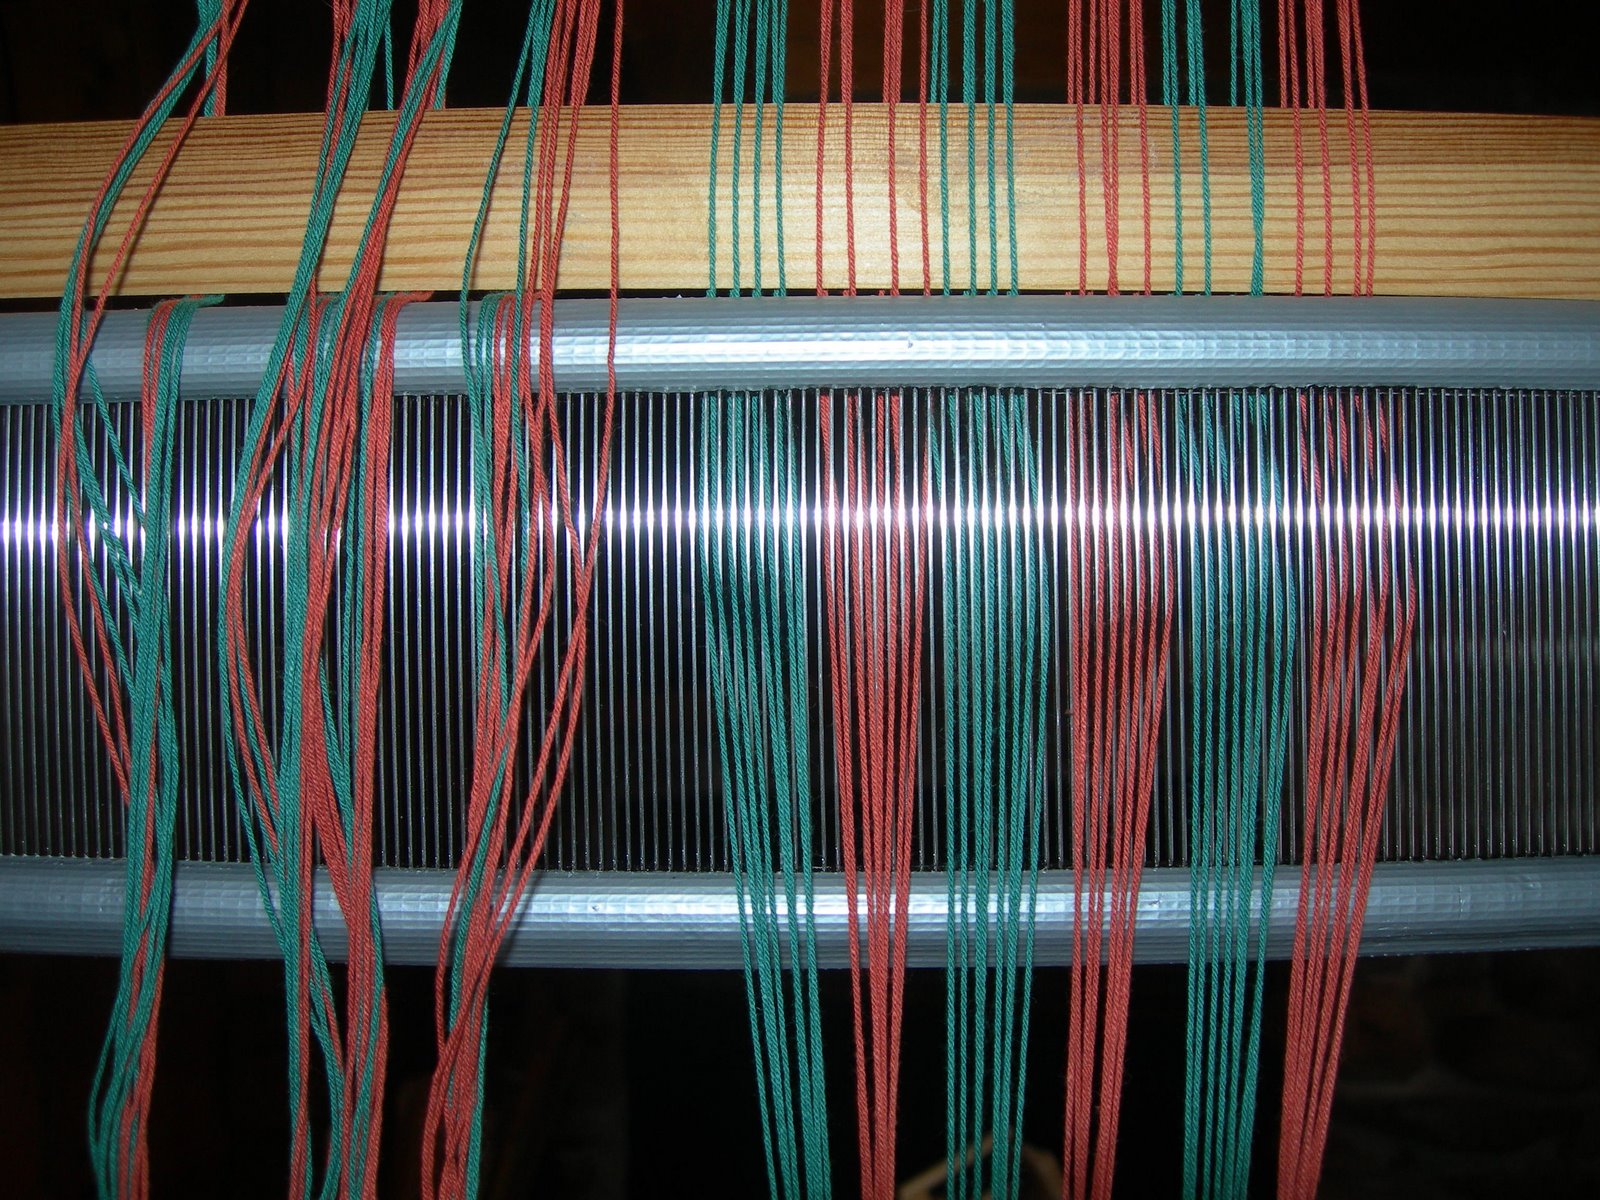
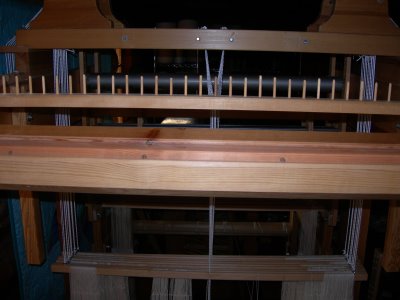
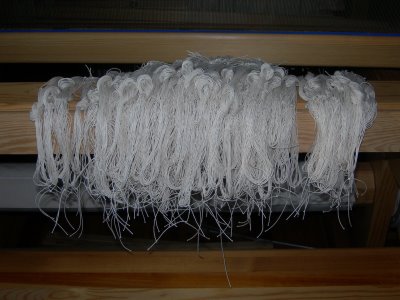
If I remember correctly this is a 20/2 cotton warp, sett 64 epi for 5 shaft (ground) satin.  The warp is spread and I’m ready to begin weaving.  Time to locate a chart I’d like to weave, to begin, then dig out designs I was working on, simplified from photos I took in China years ago.  I still need to transfer (and possibly enlarge a bit) to graph paper.

Glimakra "Sara" loom.
Glimakra “Sara” loom.

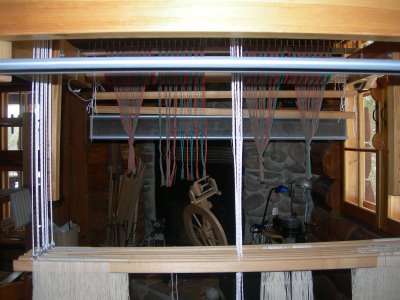
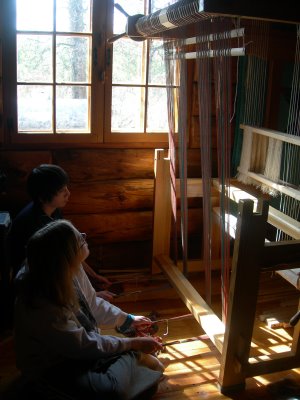
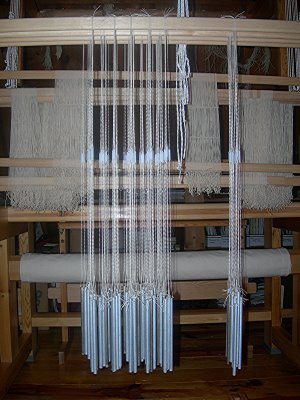
The Glimakra “Sara” upright tapestry loom is a simple frame-type loom, tall, on legs, adjustable weaving length, and has hard plastic “teeth” top and bottom to wrap yarn on.  This loom can be warped at 5 epi or 10 epi.  I may regret it, but I warped it at 10 epi with bleached 12/6 seine twine after finding the linen I was going to use was a bit too wide/coarse for that sett.  It is warped in two sections for a tapestry daily calendar.  I had decided to try this in February, then promptly came down with a head cold.  Now, I can either make up the weaving, or start March 1st.

The idea of a tapestry diary or daily calendar is to weave a small bit each day which is appealing and doesn’t feel overwhelming.  I’ve been debating with myself over how to approach this weaving,… vertical or horizontal?  A particular shape (square, rectangle, trapezoid)?  Freeform?  Color approach?  I do know this will also be a good way to learn and experiment with tapestry techniques, and color.  It’s time to sit down at the loom and take the first step, then I’ll be asking myself what took so long.

Behind the “Sara” loom in the photo above is the new-to-me “Regina” tapestry loom.  Part of the studio was rearranged to make a nice home for it, lights will be installed shortly, and I’m waiting for a new 8 dent stainless steel reed to arrive, again, from Gowdey Reed Company in Rhode Island.

The pace of life is about to pick up.  My younger daughter’s wedding is in two weeks.  We’re hoping the weather will begin to warm up a bit in early April so we can begin refinishing floors, then treating the log walls.  Our first seed order arrived and very soon we’ll be setting up and “fencing” a table in the basement where we can start seeds (and keep the cats out!).  After the snow has melted and frost is out of the ground, we’ll set up raised beds, put up fencing, and plant vegetable and flower gardens.  We’re planning to add bees next year.

And while all those projects are going on, the weaving must continue, and we’re finally going to add the opphamta attachment to my Standard loom, something I’ve been waiting years for.

In addition to the Northwoods Art Tour, and one or two open studio days of our own, I’ll again participate in a show with the Art Gypsies.  A busy and exciting year coming up!

Drawloom Setup Learning Curve

I’m back at work making more adjustments to the drawloom. The way the loom was set up, there were good sheds on six of eight sheds/treadles, yet on two, there was basically no shed at all. The bigger issue, though, is the heavy counterweights that hang on the sides of the loom still are not pulling the shafts back into position.

On a regular countermarche loom, all shafts move, either up or down, depending on your weave structure and tie-up. On a drawloom, one shaft is tied to raise, one is tied to lower, the rest stay in “neutral.” I’ve checked everything possible on this loom, over and over, and still have not been able to get the counterweights to work properly.

So today, I am readjusting almost everything. Because the guide string was a little low, instead of going through the center of the long-eye heddles, I am lowering the ground shafts an inch or so.


The goal is for the blue guide string to be centered in the long-eye heddles, and for the weighted ground warp to be resting near the bottom of the long-eye heddles. The photo above is very close (my angle when taking the photo might be off a bit).


Then, when drawcords are pulled for pattern, looking at the drawn pattern heddles further back, the distance from the guide string to the at rest weighted threads should be the same distance as from the guide string to the drawn threads. This is what I am tuning up right now, and again have it very close (again, I didn’t get the photo straight on, sorry!).

Reading again in “Damask and Opphamta” a couple nights ago, I read both upper and lower lamms should be parallel to the floor, so they will be adjusted next. (The information that came with my Standard CM states the lamms should be at specific distances from the floor, giving a slight angle up, which is how I’d set them on the drawloom. So they will be changed next.

After changing the lamms, I’ll tie up the treadles again (only 2 cords on each treadle on a drawloom). Then I’ll tie the heavy counterweights back on, one tied to each horizontal jack on each side of the loom. Their purpose is to pull the raised and lowered ground shafts back to neutral. And this is what I have not yet achieved.

There is a learning curve in setting up a double harness loom. A couple years ago, I borrowed all the Damask Study Group and Double Harness Study Group back issue newsletters from the Complex Weavers Library to help me learn more about double harness looms and weaving. I find the old newsletters invaluable for reading others weavers experiences with these looms. They are also a help to me now as study group chair/newsletter editor.

The single unit drawloom I am working on is a Glimakra 10 ground shaft/10 treadle, 4 shafts for pattern heddles, with the long extension, good for linen warps (in the future). I am using maillons on the pattern heddles instead of individual Texsolv heddles. My loom was made in the early 1980’s.

Available information on double harness looms is rather scarce, and weavers have a variety of types and brands of drawloom, making it a challenge to find weavers using the same loom you are working on.


I do have several books on the subject, some in Swedish, but unfortunately, my ability to read Swedish is not good enough to understand much of the text.

My goal, in the next couple years, is to travel to Sweden and take drawloom weaving classes, but for now, I must work here alone and try to work this out. I am, on occasion, in contact with other drawloom weavers through the CW Double Harness Study Group, and they have been most helpful with my questions. An international study group is a blessing!

Drawloom Progress Continues

While working on the drawloom, two days ago the lamms were added, as were the treadles, and all Texsolv cords, and 8 shaft satin tie-up was done, and…

the heavy counterweights were hung which help the ground shafts go back in place.

Last night, I finished threading the ground shafts (long-eye heddles), with Noah feeding me the threads from the maillons. It goes much faster with someone helping!

So this is where I am right now, about to lash the tie-on rod to the apron, and then sley the reed. After that, I’ll start tieing on groups of threads, hoping to get that job done yet tonight. Tweaking will likely wait until morning.

The countermarche is ready to weave on, the spinning wheel is ready as is the sock machine. Weaving and socks will be set out in the morning. The brochure racks are filled, for the Art Tour, Artistree, Pigeon Road Pottery, Circle of Life Studio, Arty Fridays, and of course, Shuttle Works Studio, including a new sock brochure created today in my “spare time.” Now, back to more cleaning, then the drawloom!

Sleying Drawcord Reed #1

Sleying of the drawcord warp reed has begun. The 12 dent reed is being sleyed in groups of eight threads, alternating two colors, with an empty dent in-between colors to make finding and pulling individual cords easier. Graph paper (or computer generated designs) will be color coded.


This reed sits overhead on a single unit drawloom with the cords sleyed through it. The cords are pulled individually according to the design being woven. Each cord controls a unit or group of threads on the pattern heddles on the pattern harness. The reed, as shown above, is positioned for threading, it is not in its final position here.


This view is from the back of the loom which has a long extension on it. My loom bench is sitting just inside the front of the loom, and I’m sitting facing the fireplace for threading the reed. Is this the traditional Swedish method? No. I’m trying to be a bit creative, inventive with the processes, trying to work out methods that will work and that I can do alone, as much as possible. A warping trapeze is in the not too distant future.


These two pairs of socks are for weaver Nastche Milan. Though she lives in CA, I’m hoping she will enjoy the socks on cool spring, fall, and winter nights.

Drawcord Warp is Beamed!

A few days ago, I had made the drawcord warp in four sections, placed the sections on the rod that fits inside the top beam, and began to spread the sections into the raddle. I discovered that although I had done my warp calculations correctly, my thinking of groups in the raddle did not match, so I had to move a couple threads every other section to their proper space in the raddle. This wasn’t a big problem, and I certainly won’t make that mistake again!

Once that was done today, the lease sticks were put in. While checking, I found 4 cords at the cross, scattered across the warp, that had not been caught in the lease sticks. I do not know if this happened at the warping board, or if we missed those cords while inserting the lease sticks. They were put properly in place, and the drawcord warp was beamed this afternoon.


The Swedish method of beaming a drawcord warp includes rough sleying a reed before winding the warp on. I chose not to do that, but to simply do my usual back to front warping method. I did, however, run the warp straight down and under the footboard of the loom as done the Swedish way. Noah and Sarah held the warp sections while I wound the warp on and inserted a few warp sticks. I then cut the ends and tied off, as shown below, to keep the lease sticks in place.


Next, I believe I will be able to suspend the reed directly underneath the lease sticks, pick the threads from the cross, and sley the reed, one cord per dent, 8 cords of teal, leave a dent empty, 8 cords of terra cotta, leave a dent empty, and continue alternating colors across the reed.

Once the sleyed cords are secure, I will remove the raddle, then unwinding enough drawcord warp, move the reed and warp ends back across the loom, over the steel beam, and down, so I can pick threads from the first reed, to sley the second reed. The first reed will then be moved back to the top beam and secured there. After the 20/2 weaving warp is beamed, I will be able to tie the cords to the pattern heddles.

What is all this for? The single unit drawloom is a double harness loom. It has a front ground harness, in this case 10 shafts available, and a pattern harness, which on this loom consists of four rods/shafts on which the pattern heddles hang. The pattern heddles will be set up and hang as if they were a straight twill. Each pattern heddle has a maillon through which 1 to 8 threads are threaded and works as a unit.

The ground shafts will be most likely set up as a 5 shaft satin. A design will be graphed out, and the the cords of the drawcord warp are used to pull up units of threads to create the design.

I will try to do a better job explaining this as I work through the process of setting up this loom. It has been a long time since I’ve done this, and all I have to go on are memories, a few books, most in Swedish, the CW Double Harness Study Group, and a little creative thinking. My ideas may or may not work, but either way, I will learn from them.

I’ve been searching for 20/2 mercerized cotton, on cones, so far without success, so I’ll be continuing that search this evening. While waiting for the 20/2 cotton to arrive for the warp, weaving will continue for spring, summer, and autumn at the galleries and a couple art shows. Towels, runners, rugs, and bags, and more ideas keep coming. All that plus working on my studio and home. Each day is a challenge or an adventure, sometimes both.

Drawcord Warp, Prep for Beaming

The drawcord warp was finished two days ago, and made in four sections as I don’t overlap threads when making a warp. I placed a label on each section (Drawcord Warp 1, etc.). The warp was made in groups of eight threads, and alternating two colors, teal and terra cotta (my names for them). These colors were chosen first because they were colors I could live with, and second because they weren’t too dark to see against a wood ceiling and beams, during the day, anyway.
This warp has 400 “cords,” a lot to start with, but done on the advice of a respected weaver who wrote I should make the warp for as wide and as many cords and units I thought I might like to weave. Since I’d made 400 pattern heddles, I thought this was a good place to start. 400 or so will be the maximum, but I’ll start by using a lot less. Unused cords will be tied together and tied off to the side until needed. If a future project needs more, I’ll need to make a new warp.

Above, you can see the top beam which has groove in it. There is a rod to slip the warp sections onto, then the rod is set into this groove and tied into place on each end so there is no chance of it falling out when the ratchet is turned. The raddle is taped into place and the lease sticks will be behind the raddle. String, scissors, lease sticks, and the firsts of two reeds are standing by. Basically I will be warping “back to front,” only the direction I’m working is reversed, and working on the top front of the loom. As this is a short warp, it should not take long to wind on, then picking each cord from the cross, I’ll sley the first reed.

This is how I recall doing this process long ago when Ken Colwell drive to our home to show me how to do this, and how to tie the cords to the pattern heddles. Unfortunately, some details have faded from memory over the years, so I’ll simply be inventive when needed.

The reeds, both 12 dent, 42″ long, 4″ wide, stainless steel, arrived a couple days ago. I was a bit afraid the reed for the back might be a bit too long to slide into the holders, but it slid in fine. From what I understand, the second reed is threaded on top then moved back, but because of the length of the reed I ordered (the book shows a shorter reed there which would slide easily into the holders), I expect it will be threaded further back.

More pics and description will follow as I work through this process for the first time in close to 23 or so years. I am using the book “Damask and Opphamta” by Lillemor Johansson as well as the video (also available as DVD) “Dressing Your Swedish Drawloom” by Becky Ashenden. Both are very helpful in understanding this area of weaving.

I was again watching the video last night, looking to see if there was anything on beaming a drawcord warp on an older style single unit drawloom. Although Becky covers the new method with pre-cut cords, I did not see what I find what I was looking for right then. If I find it on this video or elsewhere, I will post about it. This is an excellent video/DVD and I highly recommend it. I know I’ll be watching and learning from it again and again.

For anyone interested in drawloom weaving, Complex Weavers has a Double Harness Study Group. You must be a member of Complex Weavers ($25/year which includes 3 journals per year, membership list, lending library, study groups, and more). The Double Harness Study Group is an additional $5 per year (at present) which includes 4 newsletters per year and the option of participating in a private yahoo group.

If anyone is interested, please contact me at jzindel@newnorth.net. You do not have to have a drawloom to join, just an interest in this type of weaving. For information on Complex Weavers, or to join, go to their website at: http://www.complex-weavers.org.

Single Unit Drawloom, Starting Over

Today I decided I would finish stripping down the Glimakra single unit drawloom and really start over as it had been in storage for 13+ years. The newly washed cords for counterweights are back on the loom, and the counterweights are in a box nearby.

The old drawcord warp was made from a wonderful well-sized linen of a quality that is no longer made. After unwinding the warp and finding a few of the cords broken or chewed through, it was removed from the loom. I am using the information in “Opphampta and Damask” for length of the new warp.

I’ll also be ordering two new reeds for the drawcord warp, one for the overhead warp beam, and one that sits in the reed holders behind the round metal beam and over the pattern heddles. The reed removed from overhead today had a removable cap, and despite being tied, it had opened on one end while in storage.

The Texsolv cords on the sides of the shafts as well as the long “V” cords were also removed today, examined, and washed; two of the “V” cords need to be replaced.

Tomorrow I will remove what is left of the old warp. Since the loom has been in storage for so long I expect there would be considerable breakage of the fine cotton threads when weaving. Rather than set myself up for problems, I will re-warp the loom with new cotton.

Tonight, I am continuing research on what to use for the drawcord warp, as well as what sizes would be good for warp and weft. If all goes well, everything will be ordered tomorrow.

While waiting for the orders to arrive, the loom will be wiped down with a slightly damp cloth to remove dust (a log home/studio has dust, plus we get some of our heat from a woodrange in the kitchen), and the rest of the newly washed cords will be placed back on the loom. Meanwhile, there are more towels to weave, and socks to crank.

This morning, Shirley, another co-op gallery member, asked if I had any socks her size as her feet have been cold. I’ll be taking a selection over for her to choose from.

Linen/Cotton Towel & Drawloom Heddles


The first towel off this current warp is finished. I had hemstitched this one, washed it in warm water (in a front-loading washer), dried it on Normal, then checked dimensions. Off the loom, prior to finishing, the towel measured 30″ in length by 16″ in width. After finishing, the measurements were 22.75″ by 14.5″ losing 7.25″ (24%) by 1.25″ (8%). I was especially amazed by the shrinkage in length as I didn’t recall previously woven towels or runners woven with cottolin losing that many inches. (These measurements do not include fringe.)

I also noticed there seemed to be some tracking which I was not expecting. I’ve not had tracking occur occur before with cottolin but this weft is a single linen/cotton slub/flake type yarn. After sorting out the tangled fringe, the towel was spritzed with water, ironed with steam, then ironed again without steam. When fairly dry, I rotary cut the fringe leaving it 1.25″ in length.

I am quite pleased with this first towel and looking forward to weaving up more, varying the wefts and textures.


In addition to weaving and working on socks, I have been making long-eye heddles (using seine twine) for my single unit drawloom. Though I had started slow, I suddenly became determined to finish them so over the past few evenings, I have been cutting and tieing heddles. Last night I had 350 left to go, cut but needing to be tied, so I decided at midnight I would finish them all before going to bed. At 5 AM this morning I tied the 1,000th long-eye heddle. They are ready to put on the ground shafts, and I can go back to making more pattern heddles.

Now it is back to weaving and sock-cranking for awhile, along with some spinning but, there are two more tubes of seine twine on the way. About three years ago, I bought a 20 shaft opphampta attachment to add to my countermarche loom. There were no heddles included for either ground or pattern shafts, so after a reasonable break, I have two more sets of heddles to make.

Yes, I could use Texsolv heddles, but the cost of purchasing two thousand long-eye heddles would be around $340 plus shipping. That plus two more sets of heddles for another loom is an expense I could not make. Options needed to be considered and choices made based on funds available and other business needs and priorities. Also, the single unit drawloom already has 1,000 of the old-style string heddles on it and I just could not see replacing them as they work fine. So for the cost of a board, nails, and one tube of seine twine ($22), plus my time, I now have the 1,000 heddles I needed. I will do the same for the opphampta attachment. I have the gratification of not only saving funds on one item which will allow me to take care of a future need, but I enjoyed making the heddles. They were portable and I took them with me to work on when I had to wait, as well as working on them late in the evenings. One set done, two to go.

Drawloom, A Work In Progress

Earlier this year, my kids and I brought out and re-assembled my Glimakra Single Unit Drawloom which had been stored for the past thirteen or so years. With no directions, only my memories of assembling it long ago, we put it together. More parts, lamms, treadles, etc. are currently residing on the floor under it, but as yet do not need to be added.

After straightening out and counting the old string heddles, I found there were about 100 on each of the first nine ground shafts, with the tenth shaft having none at the moment. I must search through bags of string heddles and see if I have more of them, but expect I’ll need to order a cone of seine twine, make a jig, and make not only the needed heddles, but more for all the shafts.
After reading that the plastic maillons were no longer available, and not believing it, I wrote to Sara von Tresckow, of Woolgatherers in Fond du Lac, WI, who said she would be able to order the needed maillons from Sweden; they arrived several weeks later.

I knew I needed more lingos, and was told by a couple places that only the new U-shape lingos were available. Fortunately, Becky Ashenden of Vavstuga wrote me she had around 450 of the old style lingos (above) and would sell them to me at what I considered to be a very reasonable price, which was wonderful news. A short time later, two very heavy boxes arrived. I wiped each lingo off with a damp cloth, dried them, then wiped each one down with lemon oil, then “dried” them again.

After the maillons arrived, I found the cone of fine, very strong thread I had purchased from Ken, and set to work making new pattern heddles. I could have bought the newer U-shape lingos, and bought Texsolv pattern heddles, but preferred setting the loom up as before, in a more traditional way. So this is the point I am at now, some pattern heddles made, more are needed.

Now I must decide what to make a new drawcord warp from, do my calculations, and get it ordered. As I wrote previously, I am moving these looms down to the main floor of my home, so need to do that before I can go much further.

In the meantime, the remainder of the striped warp is waiting to be woven off, so the countermarche loom can be moved, too. Progress on weaving off the warp, making pattern heddles, making the drawcord warp, and moving the looms will be posted as I continue this journey.